


About six months ago I purchased my first sandwich maker as an impulse buy. I'm a bit of a gadget guy so i succumbed to the impulse. My usual weekly routine was to stop by the McD's on my way to work and buy a McMuffin with egg or sausage each day. The coffee comes with me from home, so its a single purchase stop.
My first attempt at making a sausage sandwich at home was mediocre at best when compared to my drive through experience. The issues were;
1. The muffin was too small and did not contain the egg and sausage properly.
2. The egg stuck to the maker leaving a mess to clean up.
3. The egg leaked a bit around the sliding plate making a small mess.
4. The precooked sausage and Canadian bacon was not heated properly.
5. The egg was tough from over cooking.
After a bit of experimenting all the issues were solved and I have been enjoying breakfast sandwiches each morning, and know whats in them. Here is what I learned.
The first problem of too small a muffin was solved by carefully selecting which brand you buy. From my experience, the cheaper the muffin, the smaller it is. You want a full size muffin that will fill the makers cooking chamber. Since I live down the street from a restaurant supply company, I buy my muffins there. They are full size and come in 10 packs. Surprisingly, they are cheaper per muffin than my local grocery store.
The next problem was solved by giving the egg cooking chamber a spritz of cooking spray after preheating the maker. This means the sliding plate as well as the sides of the ring. I use an olive oil based spray I get at the local Wally World. No more sticking and torn eggs.
The leaking was solved by first preheating the maker a little longer. I plug it in first and then go get my ingredients. The extra minute or two of preheat after the green light turns on makes a difference. Another thing that helped was the cooking spray. I apply it when the maker is hot. This seems to make a seal between the plate and ring.
The sausage not being hot enough was solved by not using a frozen patty or bacon slice. I now keep the ingredients in the refrigerator so they are cold, but not frozen. This change eliminated the issue completely. Again I have found the best deal on the ingredients at my local restaurant supply, but the Wally World sometimes beats them. If you buy a big package, just take a weeks worth and put them a plastic bag in the refrigerator and keep the rest in the freezer.
Finally the tough egg. This issue was a show stopper for me. I hate tough eggs and not solving the problem meant the maker was getting returned. It turns out the solution was rather simple. Preheat the maker a bit longer as mentioned earlier and shorten the cooking time to 3 minutes. The result is a perfect egg (for me) with the rest of the sandwich thoroughly heated.
Clean up was a breeze after using the cooking spray. I remove the cooking rings and wipe down with a damp cloth or place in the dishwasher. The maker body gets a quick wipe down and that it.
If you are a bit adventurous, try making lunch or dinner sandwiches by substituting the breakfast meat with corned beef or pastrami from the deli. In the egg chamber place a thin slice of onion and a bit of swiss cheese.
After six months, I am thoroughly satisfied. In fact I have bought a second so I have one at home and one to take with me for my regular extended hotel stays required by my job. The cost savings was amazing. This product paid for itself after two weeks just in drive through savings.
Good Job Hamilton Beach.
Since my initial review, I have found one more trick to using this product. If you load the maker as recommended, you will have the cheese against the egg. This makes the egg want to slide around on the meat especially just after cooking. I now place the cheese between the bottom muffin and meat. Problem solved.
Another tip for those using it in a hotel room or at work, I have found that Wally World sells small bags of pre diced onions, bell Peppers and jalapenos. I keep some in my hotel room fridge and instead of a plain egg, I will scramble and add some veggies. Either zap the veggies for a moment to defrost first or just not keep them in the freezer.
To mix things up a bit, I have been using sour dough, wheat, and cinnamon raisin breads instead of English muffins. The rings make a great "cookie cutter" when pressed into the bread slice. After shaping the bread I spread a small amount of butter on the side of the bread contacting the heating surfaces. The result is a nice crunch! Try spreading a bit of pesto on the other side for a savory treat. Use little to no butter when using pesto otherwise it gets a bit soggy. My favorite is sour dough, pesto, havarti cheese, sliced roast beef, and shaved onions. Heavenly lunch/dinner sandwich!
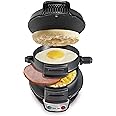
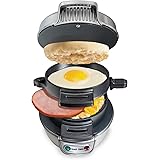
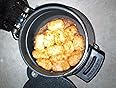
Have had a few questions on my comment regarding the size differences in english muffins. In my experience the ones I buy at a restaurant supply are larger and usually cost less per muffin than those I get at the grocery. To compare, I have uploaded a photo of each loaded into the maker. Note how differently they fill the cooking chamber. Hope this helps.
Made an interesting discovery during my last trip to the restaurant supply for English muffins. Garlic flavored cooking spray. Another simple way to easily bring flavor to the sandwich maker. Made by Vegalene, it brings a lot of flavor to my more savory creations. It is available on Amazon if you search on the name. The price per can before shipping is identical to our local restaurant supply house.
Another discovery which was obvious after thinking about it, was to vary the size of the egg. My local grocery stocks small through extra large eggs. Having tried them all, I vary between small and medium. Mostly to cut calories, but also have found the smaller the egg the shorter the cooking time.
Did a bit of an experiment recently which I want to share. While at our local Wally World I noticed some real bacon bits. Not the hard crunchy imitation kind, but the real thing. Bought a bag and gave them a try this week. On the bottom muffin, I sprinkled on a layer before putting on the cheese. The egg and top muffin was as usual. The result was excellent! A great change from my usual turkey sausage patty. Also a lot easier than fitting in strips of bacon. Have also tried them on the slide plate prior to adding the egg. Used a medium egg because of space. The bacon cooks into the egg which is actually better from a structural standpoint. Also added about 30 seconds to the cook time for best results. Have found the bits at very reasonable large package price at the restaurant supply. Just break down the lot into smaller bags and freeze. Keep just enough in the fridge for daily use.
Hello again, the sandwich makers are faithfully doing their jobs with no breakdowns or complaints after almost a year of use. I recently found myself with a bunch of bbq'd Italian sausages in the fridge. The idea arrived to cut them into rounds about 1/4 inch thick and use them in lunch and dinner sandwiches. They worked great!! Just layer them on the bottom muffin and sprinkle with some grated mozzarella cheese. For an extra kick, I threw in a few fresh basil leaves. Depending on your mood, the egg is optional. A real treat for a light dinner. One variation I really like is to first spread some spaghetti or pizza sauce on the lower muffin before adding the sausage and cheese. Cook for a bit longer to warm thoroughly before dropping the top muffin. The result reminds you of a meatball sandwich from the Italian deli.
Good morning. Ended up last weekend with a couple of extra hamburger patties from Sundays BBQ. While packing for Mondays road trip for work, I decided to do a bit of an experiment by putting them in the cooler along with a few slices of onion. That night in the hotel I broke out the sandwich maker and warmed it up thoroughly. In the upper chamber went the hamburger patty. I hand form mine for the BBQ so it was smaller in diameter and about twice as thick. It fully fills the upper chamber nicely. About three minutes in I placed both parts of the muffin along with a folded slice of American cheese in the lower chamber. After around six minutes, the muffin was removed, separated and burger and onion installed. Excellent in room meal. Repeated again the next night by eliminating the muffin heating time and putting the assembled cold muffin, cheese, and heated meat into the heating chamber with the plate slid out. I actually liked it better this way, and seemed the overall time was shorter.
An update on the hamburger post. One of my complaints has been that the outside of the muffin gets toasted excessively hard. Think I have found a way around this. After first thoroughly heating the machine, I split the muffin in half and reverse the slices so the cut sides form the top and bottom surfaces. They both then go into the bottom chamber minus any cheese. The meat goes into the top chamber and the lid closed. After about 1 to 2 minutes, or when you flip the meat, open the lid and lift the entire ring assembly out leaving the muffin exposed. Now flip the muffin over. You will see the surface that was resting on the heating plate is a toasty golden brown. Return the ring assembly and close the lid. After another 1 to 2 minutes, assemble your hamburger adding the cheese if desired. Note the bread is soft on the outside and toasted on the inside. An added benefit is that the moisture driven from the muffin during toasting is contained in the chamber making the muffin soft beyond the toasted surfaces.
I think this is a technique that can be extended beyond hamburgers with a bit of experimentation. Will keep you posted.
Was able to try this technique with some precooked Italian sausages for lunch today. Had a few left over from yesterday's BBQ, so here is what I did. Starting with a hot sandwich maker, I split and reversed the muffin as previously described. In the top chamber, I layered in about a half a sausages worth of slices straight from the fridge. Next the maker was plugged in. About the
time the green light cam on, the sausage just began to sizzle. Then as described above I removed the entire ring assembly and flipped the toasted muffin also removing the upper muffin. After replacing the rings, a whole slice of provolone went on top of the sausages along with the un-toasted muffin. The lid would not close fully, but did after the cheese melted. Alter the green light turned on again, I opened the slide allowing the sausage, provolone, and top muffin to drop down. Heating for another minute or two resulted in a cheesy, sausage sandwich. The cheese melts down into the lower muffin tying the whole thing together. Next time I plan on adding some thin onion slices. Very hot and tasty
Discovered how to make a quick hot pastrami sandwich today. Using the removable rings like a cookie cutter, I cut two circles of rye bread from a single large slice. Placed them both in the bottom compartment and turned on the sandwich maker. When the green light came on, the bread rounds were flipped to toast the other side. The top compartment was loaded with a bunch of slices of pastrami and a slice of provolone. Once the meat was hot and cheese melted, the slide plate was opened and the rings removed. Placing the now toasted round on the top completed the assembly.
Another variation on the breakfast sandwich without any meat. Using the previously described toasting method, the maker was loaded with an English muffin. After preheating and flipping the bread, two small eggs were placed in the upper compartment along with some garlic salt and a few dashes of hot sauce. Surprisingly they both fit and don't overflow the space. Cooking time is a bit longer but the combination of egg, salt garlic and heat makes for a great sandwich.
There are times when I want just an egg. I like mine as an omelette so I mix in some crumbled bacon and diced onions. They are tho ones previously described in this review. Normally I use two small eggs and they fill the upper chamber nicely. After about three minutes, just take out the rings by the handle and open the slide over your plate. Delicious!
One comment on the durability of the device. In my experience it is good. Over a year of everyday use, and nothing has gone wrong. Even the nonstick coating is in good shape. Will keep you posted.
Good morning! Did a bit of an experiment this morning. Having a bunch of thinly sliced pastrami in the fridge along with equally thin sliced onions, I tried a pastrami breakfast sandwich. In the bottom chamber went the lower muffin half, some thinly sliced onions and finally enough thin pastrami to fill up the remaining space. In the upper chamber went my usual egg, garlic salt, and muffin top. Three minutes later out came a bit of heaven. The egg was just a little bit soft bordering on runny. The soft egg with the hot pastrami was a tremendous combo and made me glad there was no cheese to get in the way of the flavor. This may become one of my regulars it was so good.
A quick note on durability, it's excellent. After almost daily use for a few years, it's still going strong. There is a slight bit of wear of the nonstick coating where the slide plate contact the rings, but that's it. Normally I wipe clean with a damp cloth and the rings into the dishwasher twice a week.
When I thought that I had tried all possible combinations, another was found. A can of corned beef was opened in our house by accident a few days ago. It was one of the rectangular cans similarly sized to a Spam can. By slicing the corned beef lengthwise with a sharp knife, I ended up with three slices, just slightly larger than an English muffin. After trimming off the corners they fit perfectly in the Sandwich Maker.
After thoroughly warming up the maker, a slice went into the bottom chamber and the whole English muffin went into the upper. In a few minutes, of sizzling one of the corned beef was nicely browned and crispy. Next the corned beef was flipped over and an egg went into the upper chamber after removing the now warmed muffin. By the time the egg was done, the other side of the corned beef was browned. Assembling the muffin, egg & corned beef made for a unique very tasty sandwich loaded with protein.
Merry Christmas all. Our sandwich maker is turning three and still operates perfectly. Zero problems, zero complaints, and that's with almost daily use.
Will keep posting as discoveries are made.
Good morning again! Over three years in and no problems whatsoever. Even the nonstick coating is perfect. Have changed up my technique a bit. Instead of the using the maker to toast the muffins, I let it cook the egg and sausage, and toast the muffin seprately. Starting with a cold maker, i put a frozen sausage patty in the bottom compartment and plug it in. At the same time i pop the muffin in the toaster. In around a minute, you hear the sausage sizzle. Flip it and crack an egg in the top compartment. About the time the toaster pops, the egg will be done. Open the slider and let the egg fall onto the sausage, then put them onto the muffin. Cheese optional. The crispy muffin is great. The overall time is really no longer than using the maker alone.
Hello all. The sandwich makers are still going strong. I had expected that they would have failed by now considering their 2013 purchase. Still love the product and use it almost every day.
Its July 2017 and the sandwitch maker is still going strong after being used almost every day. Nothing to complain about.
It's a month later and I made another twist to my technique. There are mornings, like Saturday's that I want something more than just the sandwich. My favorite paring is hashbrowns. So is it possible to do hashbrowns in the Sandwich Maker and not dirty up a fry pan? Yes it is.
So I start with a cold maker and load a pre-cooked sausage patty in the bottom compartment. In the upper goes mini tater tots, I use enough to just make one even layer. Plug it in and let the magic happen. When you hear the sausage sizzling, lift the lid and upper compartment, then flip the sausage and close it up. The potatos are ready for the lower compartment now so slide the plate and let them drop. You may have to do some rearranging with a fork to get one layer then slide the plate closed.
Now crack the egg into the upper. You may or may not have to use cooking spray depending on your desires. Put the muffins in the toaster. About the time the muffin is done, the egg will be also. Now just assemble the sandwitch, put the potatoes on a plate and your done!
The only things to clean beyond the sandwich maker is a plate and fork should you choose to use them.
Enjoy fast, free delivery, exclusive deals, and award-winning movies & TV shows with Prime
Try Prime
and start saving today with fast, free delivery
Add a debit or credit card to save time when you check out
Convenient and secure with 2 clicks. Add your card
Frequently bought together

$29.99
Get it as soon as Friday, May 17
In Stock
Total price:
To see our price, add these items to your cart.
Choose items to buy together.
Similar items that may deliver to you quickly
Page 1 of 1 Start overPage 1 of 1
From the manufacturer

Forget the fast food drive-through.
With the Hamilton Beach Breakfast Sandwich Maker, you can enjoy a hot, homemade breakfast, lunch, or dinner sandwich in minutes using your own fresh ingredients.


Hamilton Beach products are thoughtfully designed to make your life easier. We use consumer insights, in-depth research and rigorous testing to deliver the best solution to your everyday needs.
Whether it's preparing delicious meals and beverages effortlessly, or making your clothes look their best, you can count on the brand that has spent over 100 years creating products with you in mind.
Hamilton Beach Breakfast Sandwich Maker
Make hot, hearty breakfast, lunch, or dinner sandwiches in 5 minutes or less!
Simply build the base of your sandwich in the bottom layer, place the egg and your sandwich’s top layer on the upper cooking plate, and close the lid.
In just five minutes, your breakfast sandwich is ready to eat. Explore more than 25 sandwich recipes on our website, from the traditional egg, ham, and cheese to more unique options like cheddar, apple, bacon, and egg croissant sandwich. All removable parts are dishwasher safe; surfaces are covered with durable, nonstick coating.
- Make a hot and hearty breakfast sandwich at home, ready to eat in 5 minutes or less
- Use your own fresh ingredients, including eggs, cheese & precooked meat
- Cooks every layer of your breakfast sandwich to perfection
- Cooking plate cooks a fresh egg perfectly, then slides out to assemble your sandwich
- Make sandwiches with English muffins, biscuits, small bagels, and more
- All removable parts are dishwasher safe and surfaces are covered with durable, nonstick coating
Features:
|
|
|
|
|---|---|---|
Quick and EasyEasily create a breakfast, lunch, or dinner sandwich. Perfect for brunch or a quick meal on the go. |
Use Your Own Fresh IngredientsCustomize your sandwich with your favorite bread, cheese, eggs, meats, and much more. |
Get InspiredExplore more than 25 sandwich maker recipes on our website. |
|
|
|
|
|---|---|---|
Just 4 Easy Steps!Simply 1) add bread and precooked meat or cheese to the bottom cooking plate. 2) Crack an egg into the upper egg plate, then 3) layer the second piece of bread on top of the egg and close the lid. 4) Once your sandwich is done cooking, just slide the egg plate out to assemble the sandwich. |
Easy CleanupAll removable parts are dishwasher safe; surfaces are covered with durable, nonstick coating. |
Ready to Eat in 5 MinutesEnjoy your custom sandwich in just 5 minutes! |

|

|

|

|
|
|---|---|---|---|---|
| Breakfast Sandwich Maker | Dual Breakfast Sandwich Maker with Timer | Breakfast Sandwich Maker | Breakfast Sandwich Maker | |
| Customer Reviews |
42,165
|
23,418
|
42,165
|
42,165
|
| Price | $29.99 | $42.99 | $29.99 | $29.99 |
| Timer with audible tone | ✓ | |||
| Color | Silver | Silver | Red | Black |
| Quick and easy recipes included | ✓ | ✓ | ✓ | ✓ |
| Number of sandwiches at a time | 1 | 2 | 1 | 1 |
| Dishwasher safe removable parts are | ✓ | ✓ | ✓ | ✓ |
Videos
Page 1 of 1Start OverPage 1 of 1
Videos for this product

2:28
Click to play video
Only 1 thing I didn't like about this product
Devin gee
Videos for this product
1:06
Click to play video
Should you buy this Hamilton Beach Sandwich Maker?
✅ Cody Wanner
Compare with similar items
This Item  Hamilton Beach Breakfast Sandwich Maker with Egg Cooker Ring, Customize Ingredients, Perfect for English Muffins, Croissants, Mini Waffles, Perfect White Elephant Gifts, Red (25476) |  |  |  |  |  | |
| Price | $29.99 | -8% $36.99 Typical: $39.99 | -5% $18.99 List: $19.99 | $19.03 | $29.99 | $42.99 |
| Delivery | Get it as soon as Friday, May 17 | Get it as soon as Friday, May 17 | Get it as soon as Friday, May 17 | Get it as soon as Friday, May 17 | Get it as soon as Friday, May 17 | Get it as soon as Friday, May 17 |
| Customer Ratings | ||||||
| Flavor | ||||||
| Easy to clean | ||||||
| Easy to use | ||||||
| Durability | ||||||
| Versatility | ||||||
| Sold By | Amazon.com | Baker's Friend USA | Amazon.com | Amazon.com | Amazon.com | Amazon.com |
| style | Sandwich Maker | Breakfast Sandwich Maker | Omelet | omelet maker | Sandwich Maker | Silver Double |
| material | Plastic | Plastic, Metal | Stainless Steel | Stainless Steel | Plastic | Plastic |
| number of settings | 1 | — | — | 0 | 1 | — |
| voltage | — | 120 volts | — | 120 volts | 110 volts | 120 volts |
| wattage | 600 watts | 1000 watts | 750 watts | 760 watts | 600 watts | 1200 watts |
| weight | 3 pounds | 3.9 pounds | — | 2 pounds | 1.47 pounds | 4.8 pounds |
Reviews with images
So good I have two!
About six months ago I purchased my first sandwich maker as an impulse buy. I'm a bit of a gadget guy so i succumbed to the impulse. My usual weekly routine was to stop by the McD's on my way to work and buy a McMuffin with egg or sausage each day. The coffee comes with me from home, so its a single purchase stop.My first attempt at making a sausage sandwich at home was mediocre at best when compared to my drive through experience. The issues were;1. The muffin was too small and did not contain the egg and sausage properly.2. The egg stuck to the maker leaving a mess to clean up.3. The egg leaked a bit around the sliding plate making a small mess.4. The precooked sausage and Canadian bacon was not heated properly.5. The egg was tough from over cooking.After a bit of experimenting all the issues were solved and I have been enjoying breakfast sandwiches each morning, and know whats in them. Here is what I learned.The first problem of too small a muffin was solved by carefully selecting which brand you buy. From my experience, the cheaper the muffin, the smaller it is. You want a full size muffin that will fill the makers cooking chamber. Since I live down the street from a restaurant supply company, I buy my muffins there. They are full size and come in 10 packs. Surprisingly, they are cheaper per muffin than my local grocery store.The next problem was solved by giving the egg cooking chamber a spritz of cooking spray after preheating the maker. This means the sliding plate as well as the sides of the ring. I use an olive oil based spray I get at the local Wally World. No more sticking and torn eggs.The leaking was solved by first preheating the maker a little longer. I plug it in first and then go get my ingredients. The extra minute or two of preheat after the green light turns on makes a difference. Another thing that helped was the cooking spray. I apply it when the maker is hot. This seems to make a seal between the plate and ring.The sausage not being hot enough was solved by not using a frozen patty or bacon slice. I now keep the ingredients in the refrigerator so they are cold, but not frozen. This change eliminated the issue completely. Again I have found the best deal on the ingredients at my local restaurant supply, but the Wally World sometimes beats them. If you buy a big package, just take a weeks worth and put them a plastic bag in the refrigerator and keep the rest in the freezer.Finally the tough egg. This issue was a show stopper for me. I hate tough eggs and not solving the problem meant the maker was getting returned. It turns out the solution was rather simple. Preheat the maker a bit longer as mentioned earlier and shorten the cooking time to 3 minutes. The result is a perfect egg (for me) with the rest of the sandwich thoroughly heated.Clean up was a breeze after using the cooking spray. I remove the cooking rings and wipe down with a damp cloth or place in the dishwasher. The maker body gets a quick wipe down and that it.If you are a bit adventurous, try making lunch or dinner sandwiches by substituting the breakfast meat with corned beef or pastrami from the deli. In the egg chamber place a thin slice of onion and a bit of swiss cheese.After six months, I am thoroughly satisfied. In fact I have bought a second so I have one at home and one to take with me for my regular extended hotel stays required by my job. The cost savings was amazing. This product paid for itself after two weeks just in drive through savings.Good Job Hamilton Beach.Since my initial review, I have found one more trick to using this product. If you load the maker as recommended, you will have the cheese against the egg. This makes the egg want to slide around on the meat especially just after cooking. I now place the cheese between the bottom muffin and meat. Problem solved.Another tip for those using it in a hotel room or at work, I have found that Wally World sells small bags of pre diced onions, bell Peppers and jalapenos. I keep some in my hotel room fridge and instead of a plain egg, I will scramble and add some veggies. Either zap the veggies for a moment to defrost first or just not keep them in the freezer.To mix things up a bit, I have been using sour dough, wheat, and cinnamon raisin breads instead of English muffins. The rings make a great "cookie cutter" when pressed into the bread slice. After shaping the bread I spread a small amount of butter on the side of the bread contacting the heating surfaces. The result is a nice crunch! Try spreading a bit of pesto on the other side for a savory treat. Use little to no butter when using pesto otherwise it gets a bit soggy. My favorite is sour dough, pesto, havarti cheese, sliced roast beef, and shaved onions. Heavenly lunch/dinner sandwich!Have had a few questions on my comment regarding the size differences in english muffins. In my experience the ones I buy at a restaurant supply are larger and usually cost less per muffin than those I get at the grocery. To compare, I have uploaded a photo of each loaded into the maker. Note how differently they fill the cooking chamber. Hope this helps.Made an interesting discovery during my last trip to the restaurant supply for English muffins. Garlic flavored cooking spray. Another simple way to easily bring flavor to the sandwich maker. Made by Vegalene, it brings a lot of flavor to my more savory creations. It is available on Amazon if you search on the name. The price per can before shipping is identical to our local restaurant supply house.Another discovery which was obvious after thinking about it, was to vary the size of the egg. My local grocery stocks small through extra large eggs. Having tried them all, I vary between small and medium. Mostly to cut calories, but also have found the smaller the egg the shorter the cooking time.Did a bit of an experiment recently which I want to share. While at our local Wally World I noticed some real bacon bits. Not the hard crunchy imitation kind, but the real thing. Bought a bag and gave them a try this week. On the bottom muffin, I sprinkled on a layer before putting on the cheese. The egg and top muffin was as usual. The result was excellent! A great change from my usual turkey sausage patty. Also a lot easier than fitting in strips of bacon. Have also tried them on the slide plate prior to adding the egg. Used a medium egg because of space. The bacon cooks into the egg which is actually better from a structural standpoint. Also added about 30 seconds to the cook time for best results. Have found the bits at very reasonable large package price at the restaurant supply. Just break down the lot into smaller bags and freeze. Keep just enough in the fridge for daily use.Hello again, the sandwich makers are faithfully doing their jobs with no breakdowns or complaints after almost a year of use. I recently found myself with a bunch of bbq'd Italian sausages in the fridge. The idea arrived to cut them into rounds about 1/4 inch thick and use them in lunch and dinner sandwiches. They worked great!! Just layer them on the bottom muffin and sprinkle with some grated mozzarella cheese. For an extra kick, I threw in a few fresh basil leaves. Depending on your mood, the egg is optional. A real treat for a light dinner. One variation I really like is to first spread some spaghetti or pizza sauce on the lower muffin before adding the sausage and cheese. Cook for a bit longer to warm thoroughly before dropping the top muffin. The result reminds you of a meatball sandwich from the Italian deli.Good morning. Ended up last weekend with a couple of extra hamburger patties from Sundays BBQ. While packing for Mondays road trip for work, I decided to do a bit of an experiment by putting them in the cooler along with a few slices of onion. That night in the hotel I broke out the sandwich maker and warmed it up thoroughly. In the upper chamber went the hamburger patty. I hand form mine for the BBQ so it was smaller in diameter and about twice as thick. It fully fills the upper chamber nicely. About three minutes in I placed both parts of the muffin along with a folded slice of American cheese in the lower chamber. After around six minutes, the muffin was removed, separated and burger and onion installed. Excellent in room meal. Repeated again the next night by eliminating the muffin heating time and putting the assembled cold muffin, cheese, and heated meat into the heating chamber with the plate slid out. I actually liked it better this way, and seemed the overall time was shorter.An update on the hamburger post. One of my complaints has been that the outside of the muffin gets toasted excessively hard. Think I have found a way around this. After first thoroughly heating the machine, I split the muffin in half and reverse the slices so the cut sides form the top and bottom surfaces. They both then go into the bottom chamber minus any cheese. The meat goes into the top chamber and the lid closed. After about 1 to 2 minutes, or when you flip the meat, open the lid and lift the entire ring assembly out leaving the muffin exposed. Now flip the muffin over. You will see the surface that was resting on the heating plate is a toasty golden brown. Return the ring assembly and close the lid. After another 1 to 2 minutes, assemble your hamburger adding the cheese if desired. Note the bread is soft on the outside and toasted on the inside. An added benefit is that the moisture driven from the muffin during toasting is contained in the chamber making the muffin soft beyond the toasted surfaces.I think this is a technique that can be extended beyond hamburgers with a bit of experimentation. Will keep you posted.Was able to try this technique with some precooked Italian sausages for lunch today. Had a few left over from yesterday's BBQ, so here is what I did. Starting with a hot sandwich maker, I split and reversed the muffin as previously described. In the top chamber, I layered in about a half a sausages worth of slices straight from the fridge. Next the maker was plugged in. About thetime the green light cam on, the sausage just began to sizzle. Then as described above I removed the entire ring assembly and flipped the toasted muffin also removing the upper muffin. After replacing the rings, a whole slice of provolone went on top of the sausages along with the un-toasted muffin. The lid would not close fully, but did after the cheese melted. Alter the green light turned on again, I opened the slide allowing the sausage, provolone, and top muffin to drop down. Heating for another minute or two resulted in a cheesy, sausage sandwich. The cheese melts down into the lower muffin tying the whole thing together. Next time I plan on adding some thin onion slices. Very hot and tastyDiscovered how to make a quick hot pastrami sandwich today. Using the removable rings like a cookie cutter, I cut two circles of rye bread from a single large slice. Placed them both in the bottom compartment and turned on the sandwich maker. When the green light came on, the bread rounds were flipped to toast the other side. The top compartment was loaded with a bunch of slices of pastrami and a slice of provolone. Once the meat was hot and cheese melted, the slide plate was opened and the rings removed. Placing the now toasted round on the top completed the assembly.Another variation on the breakfast sandwich without any meat. Using the previously described toasting method, the maker was loaded with an English muffin. After preheating and flipping the bread, two small eggs were placed in the upper compartment along with some garlic salt and a few dashes of hot sauce. Surprisingly they both fit and don't overflow the space. Cooking time is a bit longer but the combination of egg, salt garlic and heat makes for a great sandwich.There are times when I want just an egg. I like mine as an omelette so I mix in some crumbled bacon and diced onions. They are tho ones previously described in this review. Normally I use two small eggs and they fill the upper chamber nicely. After about three minutes, just take out the rings by the handle and open the slide over your plate. Delicious!One comment on the durability of the device. In my experience it is good. Over a year of everyday use, and nothing has gone wrong. Even the nonstick coating is in good shape. Will keep you posted.Good morning! Did a bit of an experiment this morning. Having a bunch of thinly sliced pastrami in the fridge along with equally thin sliced onions, I tried a pastrami breakfast sandwich. In the bottom chamber went the lower muffin half, some thinly sliced onions and finally enough thin pastrami to fill up the remaining space. In the upper chamber went my usual egg, garlic salt, and muffin top. Three minutes later out came a bit of heaven. The egg was just a little bit soft bordering on runny. The soft egg with the hot pastrami was a tremendous combo and made me glad there was no cheese to get in the way of the flavor. This may become one of my regulars it was so good.A quick note on durability, it's excellent. After almost daily use for a few years, it's still going strong. There is a slight bit of wear of the nonstick coating where the slide plate contact the rings, but that's it. Normally I wipe clean with a damp cloth and the rings into the dishwasher twice a week.When I thought that I had tried all possible combinations, another was found. A can of corned beef was opened in our house by accident a few days ago. It was one of the rectangular cans similarly sized to a Spam can. By slicing the corned beef lengthwise with a sharp knife, I ended up with three slices, just slightly larger than an English muffin. After trimming off the corners they fit perfectly in the Sandwich Maker.After thoroughly warming up the maker, a slice went into the bottom chamber and the whole English muffin went into the upper. In a few minutes, of sizzling one of the corned beef was nicely browned and crispy. Next the corned beef was flipped over and an egg went into the upper chamber after removing the now warmed muffin. By the time the egg was done, the other side of the corned beef was browned. Assembling the muffin, egg & corned beef made for a unique very tasty sandwich loaded with protein.Merry Christmas all. Our sandwich maker is turning three and still operates perfectly. Zero problems, zero complaints, and that's with almost daily use.Will keep posting as discoveries are made.Good morning again! Over three years in and no problems whatsoever. Even the nonstick coating is perfect. Have changed up my technique a bit. Instead of the using the maker to toast the muffins, I let it cook the egg and sausage, and toast the muffin seprately. Starting with a cold maker, i put a frozen sausage patty in the bottom compartment and plug it in. At the same time i pop the muffin in the toaster. In around a minute, you hear the sausage sizzle. Flip it and crack an egg in the top compartment. About the time the toaster pops, the egg will be done. Open the slider and let the egg fall onto the sausage, then put them onto the muffin. Cheese optional. The crispy muffin is great. The overall time is really no longer than using the maker alone.Hello all. The sandwich makers are still going strong. I had expected that they would have failed by now considering their 2013 purchase. Still love the product and use it almost every day.Its July 2017 and the sandwitch maker is still going strong after being used almost every day. Nothing to complain about.It's a month later and I made another twist to my technique. There are mornings, like Saturday's that I want something more than just the sandwich. My favorite paring is hashbrowns. So is it possible to do hashbrowns in the Sandwich Maker and not dirty up a fry pan? Yes it is.So I start with a cold maker and load a pre-cooked sausage patty in the bottom compartment. In the upper goes mini tater tots, I use enough to just make one even layer. Plug it in and let the magic happen. When you hear the sausage sizzling, lift the lid and upper compartment, then flip the sausage and close it up. The potatos are ready for the lower compartment now so slide the plate and let them drop. You may have to do some rearranging with a fork to get one layer then slide the plate closed.Now crack the egg into the upper. You may or may not have to use cooking spray depending on your desires. Put the muffins in the toaster. About the time the muffin is done, the egg will be also. Now just assemble the sandwitch, put the potatoes on a plate and your done!The only things to clean beyond the sandwich maker is a plate and fork should you choose to use them.
Top reviews from the United States
There was a problem filtering reviews right now. Please try again later.
Reviewed in the United States on November 2, 2013

Color: SilverSize: SingleVerified Purchase
About six months ago I purchased my first sandwich maker as an impulse buy. I'm a bit of a gadget guy so i succumbed to the impulse. My usual weekly routine was to stop by the McD's on my way to work and buy a McMuffin with egg or sausage each day. The coffee comes with me from home, so its a single purchase stop.
My first attempt at making a sausage sandwich at home was mediocre at best when compared to my drive through experience. The issues were;
1. The muffin was too small and did not contain the egg and sausage properly.
2. The egg stuck to the maker leaving a mess to clean up.
3. The egg leaked a bit around the sliding plate making a small mess.
4. The precooked sausage and Canadian bacon was not heated properly.
5. The egg was tough from over cooking.
After a bit of experimenting all the issues were solved and I have been enjoying breakfast sandwiches each morning, and know whats in them. Here is what I learned.
The first problem of too small a muffin was solved by carefully selecting which brand you buy. From my experience, the cheaper the muffin, the smaller it is. You want a full size muffin that will fill the makers cooking chamber. Since I live down the street from a restaurant supply company, I buy my muffins there. They are full size and come in 10 packs. Surprisingly, they are cheaper per muffin than my local grocery store.
The next problem was solved by giving the egg cooking chamber a spritz of cooking spray after preheating the maker. This means the sliding plate as well as the sides of the ring. I use an olive oil based spray I get at the local Wally World. No more sticking and torn eggs.
The leaking was solved by first preheating the maker a little longer. I plug it in first and then go get my ingredients. The extra minute or two of preheat after the green light turns on makes a difference. Another thing that helped was the cooking spray. I apply it when the maker is hot. This seems to make a seal between the plate and ring.
The sausage not being hot enough was solved by not using a frozen patty or bacon slice. I now keep the ingredients in the refrigerator so they are cold, but not frozen. This change eliminated the issue completely. Again I have found the best deal on the ingredients at my local restaurant supply, but the Wally World sometimes beats them. If you buy a big package, just take a weeks worth and put them a plastic bag in the refrigerator and keep the rest in the freezer.
Finally the tough egg. This issue was a show stopper for me. I hate tough eggs and not solving the problem meant the maker was getting returned. It turns out the solution was rather simple. Preheat the maker a bit longer as mentioned earlier and shorten the cooking time to 3 minutes. The result is a perfect egg (for me) with the rest of the sandwich thoroughly heated.
Clean up was a breeze after using the cooking spray. I remove the cooking rings and wipe down with a damp cloth or place in the dishwasher. The maker body gets a quick wipe down and that it.
If you are a bit adventurous, try making lunch or dinner sandwiches by substituting the breakfast meat with corned beef or pastrami from the deli. In the egg chamber place a thin slice of onion and a bit of swiss cheese.
After six months, I am thoroughly satisfied. In fact I have bought a second so I have one at home and one to take with me for my regular extended hotel stays required by my job. The cost savings was amazing. This product paid for itself after two weeks just in drive through savings.
Good Job Hamilton Beach.
Since my initial review, I have found one more trick to using this product. If you load the maker as recommended, you will have the cheese against the egg. This makes the egg want to slide around on the meat especially just after cooking. I now place the cheese between the bottom muffin and meat. Problem solved.
Another tip for those using it in a hotel room or at work, I have found that Wally World sells small bags of pre diced onions, bell Peppers and jalapenos. I keep some in my hotel room fridge and instead of a plain egg, I will scramble and add some veggies. Either zap the veggies for a moment to defrost first or just not keep them in the freezer.
To mix things up a bit, I have been using sour dough, wheat, and cinnamon raisin breads instead of English muffins. The rings make a great "cookie cutter" when pressed into the bread slice. After shaping the bread I spread a small amount of butter on the side of the bread contacting the heating surfaces. The result is a nice crunch! Try spreading a bit of pesto on the other side for a savory treat. Use little to no butter when using pesto otherwise it gets a bit soggy. My favorite is sour dough, pesto, havarti cheese, sliced roast beef, and shaved onions. Heavenly lunch/dinner sandwich!
Have had a few questions on my comment regarding the size differences in english muffins. In my experience the ones I buy at a restaurant supply are larger and usually cost less per muffin than those I get at the grocery. To compare, I have uploaded a photo of each loaded into the maker. Note how differently they fill the cooking chamber. Hope this helps.
Made an interesting discovery during my last trip to the restaurant supply for English muffins. Garlic flavored cooking spray. Another simple way to easily bring flavor to the sandwich maker. Made by Vegalene, it brings a lot of flavor to my more savory creations. It is available on Amazon if you search on the name. The price per can before shipping is identical to our local restaurant supply house.
Another discovery which was obvious after thinking about it, was to vary the size of the egg. My local grocery stocks small through extra large eggs. Having tried them all, I vary between small and medium. Mostly to cut calories, but also have found the smaller the egg the shorter the cooking time.
Did a bit of an experiment recently which I want to share. While at our local Wally World I noticed some real bacon bits. Not the hard crunchy imitation kind, but the real thing. Bought a bag and gave them a try this week. On the bottom muffin, I sprinkled on a layer before putting on the cheese. The egg and top muffin was as usual. The result was excellent! A great change from my usual turkey sausage patty. Also a lot easier than fitting in strips of bacon. Have also tried them on the slide plate prior to adding the egg. Used a medium egg because of space. The bacon cooks into the egg which is actually better from a structural standpoint. Also added about 30 seconds to the cook time for best results. Have found the bits at very reasonable large package price at the restaurant supply. Just break down the lot into smaller bags and freeze. Keep just enough in the fridge for daily use.
Hello again, the sandwich makers are faithfully doing their jobs with no breakdowns or complaints after almost a year of use. I recently found myself with a bunch of bbq'd Italian sausages in the fridge. The idea arrived to cut them into rounds about 1/4 inch thick and use them in lunch and dinner sandwiches. They worked great!! Just layer them on the bottom muffin and sprinkle with some grated mozzarella cheese. For an extra kick, I threw in a few fresh basil leaves. Depending on your mood, the egg is optional. A real treat for a light dinner. One variation I really like is to first spread some spaghetti or pizza sauce on the lower muffin before adding the sausage and cheese. Cook for a bit longer to warm thoroughly before dropping the top muffin. The result reminds you of a meatball sandwich from the Italian deli.
Good morning. Ended up last weekend with a couple of extra hamburger patties from Sundays BBQ. While packing for Mondays road trip for work, I decided to do a bit of an experiment by putting them in the cooler along with a few slices of onion. That night in the hotel I broke out the sandwich maker and warmed it up thoroughly. In the upper chamber went the hamburger patty. I hand form mine for the BBQ so it was smaller in diameter and about twice as thick. It fully fills the upper chamber nicely. About three minutes in I placed both parts of the muffin along with a folded slice of American cheese in the lower chamber. After around six minutes, the muffin was removed, separated and burger and onion installed. Excellent in room meal. Repeated again the next night by eliminating the muffin heating time and putting the assembled cold muffin, cheese, and heated meat into the heating chamber with the plate slid out. I actually liked it better this way, and seemed the overall time was shorter.
An update on the hamburger post. One of my complaints has been that the outside of the muffin gets toasted excessively hard. Think I have found a way around this. After first thoroughly heating the machine, I split the muffin in half and reverse the slices so the cut sides form the top and bottom surfaces. They both then go into the bottom chamber minus any cheese. The meat goes into the top chamber and the lid closed. After about 1 to 2 minutes, or when you flip the meat, open the lid and lift the entire ring assembly out leaving the muffin exposed. Now flip the muffin over. You will see the surface that was resting on the heating plate is a toasty golden brown. Return the ring assembly and close the lid. After another 1 to 2 minutes, assemble your hamburger adding the cheese if desired. Note the bread is soft on the outside and toasted on the inside. An added benefit is that the moisture driven from the muffin during toasting is contained in the chamber making the muffin soft beyond the toasted surfaces.
I think this is a technique that can be extended beyond hamburgers with a bit of experimentation. Will keep you posted.
Was able to try this technique with some precooked Italian sausages for lunch today. Had a few left over from yesterday's BBQ, so here is what I did. Starting with a hot sandwich maker, I split and reversed the muffin as previously described. In the top chamber, I layered in about a half a sausages worth of slices straight from the fridge. Next the maker was plugged in. About the
time the green light cam on, the sausage just began to sizzle. Then as described above I removed the entire ring assembly and flipped the toasted muffin also removing the upper muffin. After replacing the rings, a whole slice of provolone went on top of the sausages along with the un-toasted muffin. The lid would not close fully, but did after the cheese melted. Alter the green light turned on again, I opened the slide allowing the sausage, provolone, and top muffin to drop down. Heating for another minute or two resulted in a cheesy, sausage sandwich. The cheese melts down into the lower muffin tying the whole thing together. Next time I plan on adding some thin onion slices. Very hot and tasty
Discovered how to make a quick hot pastrami sandwich today. Using the removable rings like a cookie cutter, I cut two circles of rye bread from a single large slice. Placed them both in the bottom compartment and turned on the sandwich maker. When the green light came on, the bread rounds were flipped to toast the other side. The top compartment was loaded with a bunch of slices of pastrami and a slice of provolone. Once the meat was hot and cheese melted, the slide plate was opened and the rings removed. Placing the now toasted round on the top completed the assembly.
Another variation on the breakfast sandwich without any meat. Using the previously described toasting method, the maker was loaded with an English muffin. After preheating and flipping the bread, two small eggs were placed in the upper compartment along with some garlic salt and a few dashes of hot sauce. Surprisingly they both fit and don't overflow the space. Cooking time is a bit longer but the combination of egg, salt garlic and heat makes for a great sandwich.
There are times when I want just an egg. I like mine as an omelette so I mix in some crumbled bacon and diced onions. They are tho ones previously described in this review. Normally I use two small eggs and they fill the upper chamber nicely. After about three minutes, just take out the rings by the handle and open the slide over your plate. Delicious!
One comment on the durability of the device. In my experience it is good. Over a year of everyday use, and nothing has gone wrong. Even the nonstick coating is in good shape. Will keep you posted.
Good morning! Did a bit of an experiment this morning. Having a bunch of thinly sliced pastrami in the fridge along with equally thin sliced onions, I tried a pastrami breakfast sandwich. In the bottom chamber went the lower muffin half, some thinly sliced onions and finally enough thin pastrami to fill up the remaining space. In the upper chamber went my usual egg, garlic salt, and muffin top. Three minutes later out came a bit of heaven. The egg was just a little bit soft bordering on runny. The soft egg with the hot pastrami was a tremendous combo and made me glad there was no cheese to get in the way of the flavor. This may become one of my regulars it was so good.
A quick note on durability, it's excellent. After almost daily use for a few years, it's still going strong. There is a slight bit of wear of the nonstick coating where the slide plate contact the rings, but that's it. Normally I wipe clean with a damp cloth and the rings into the dishwasher twice a week.
When I thought that I had tried all possible combinations, another was found. A can of corned beef was opened in our house by accident a few days ago. It was one of the rectangular cans similarly sized to a Spam can. By slicing the corned beef lengthwise with a sharp knife, I ended up with three slices, just slightly larger than an English muffin. After trimming off the corners they fit perfectly in the Sandwich Maker.
After thoroughly warming up the maker, a slice went into the bottom chamber and the whole English muffin went into the upper. In a few minutes, of sizzling one of the corned beef was nicely browned and crispy. Next the corned beef was flipped over and an egg went into the upper chamber after removing the now warmed muffin. By the time the egg was done, the other side of the corned beef was browned. Assembling the muffin, egg & corned beef made for a unique very tasty sandwich loaded with protein.
Merry Christmas all. Our sandwich maker is turning three and still operates perfectly. Zero problems, zero complaints, and that's with almost daily use.
Will keep posting as discoveries are made.
Good morning again! Over three years in and no problems whatsoever. Even the nonstick coating is perfect. Have changed up my technique a bit. Instead of the using the maker to toast the muffins, I let it cook the egg and sausage, and toast the muffin seprately. Starting with a cold maker, i put a frozen sausage patty in the bottom compartment and plug it in. At the same time i pop the muffin in the toaster. In around a minute, you hear the sausage sizzle. Flip it and crack an egg in the top compartment. About the time the toaster pops, the egg will be done. Open the slider and let the egg fall onto the sausage, then put them onto the muffin. Cheese optional. The crispy muffin is great. The overall time is really no longer than using the maker alone.
Hello all. The sandwich makers are still going strong. I had expected that they would have failed by now considering their 2013 purchase. Still love the product and use it almost every day.
Its July 2017 and the sandwitch maker is still going strong after being used almost every day. Nothing to complain about.
It's a month later and I made another twist to my technique. There are mornings, like Saturday's that I want something more than just the sandwich. My favorite paring is hashbrowns. So is it possible to do hashbrowns in the Sandwich Maker and not dirty up a fry pan? Yes it is.
So I start with a cold maker and load a pre-cooked sausage patty in the bottom compartment. In the upper goes mini tater tots, I use enough to just make one even layer. Plug it in and let the magic happen. When you hear the sausage sizzling, lift the lid and upper compartment, then flip the sausage and close it up. The potatos are ready for the lower compartment now so slide the plate and let them drop. You may have to do some rearranging with a fork to get one layer then slide the plate closed.
Now crack the egg into the upper. You may or may not have to use cooking spray depending on your desires. Put the muffins in the toaster. About the time the muffin is done, the egg will be also. Now just assemble the sandwitch, put the potatoes on a plate and your done!
The only things to clean beyond the sandwich maker is a plate and fork should you choose to use them.
Images in this review


Top reviews from other countries
Lauren
Leaks ...
Reviewed in Canada on November 20, 2023Color: MintSize: SingleVerified Purchase
Lauren
Reviewed in Canada on November 20, 2023
Images in this review


Dante omar
Me gusto mucho su calidad
Reviewed in Mexico on January 15, 2024Color: BlackSize: SingleVerified Purchase
Amazon Customer
Pratique
Reviewed in Canada on August 6, 2023Color: CoralSize: SingleVerified Purchase
Jose
Funciona correctamente
Reviewed in Mexico on May 21, 2023Color: CoralSize: SingleVerified Purchase
Joseph Glynn
Incredible Product
Reviewed in Canada on March 20, 2023Color: RedSize: SingleVerified Purchase
